

How to Make a Virtual Tour on Your Phone (Step-by-Step Guide)
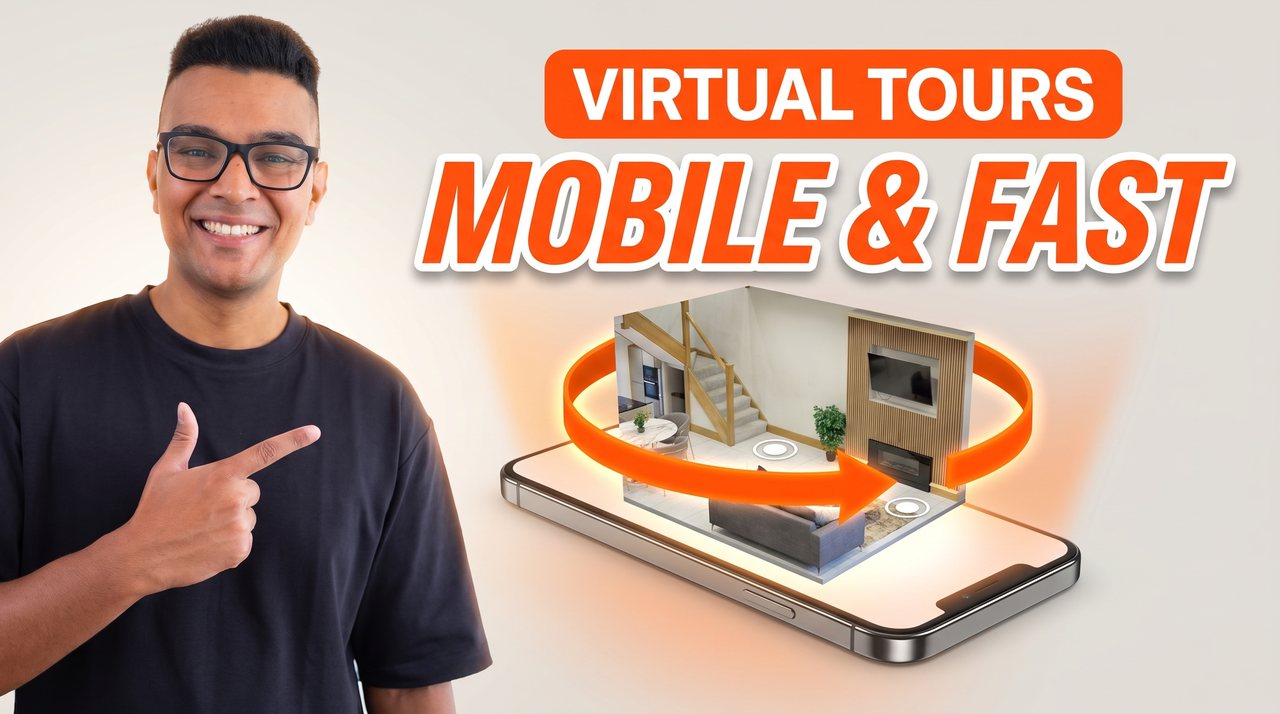
To make a virtual tour, you take a 360° photo of each room, link the photos together so viewers can move from room to room, and publish the result as a link anyone can open. With Clear Pano you do all of it on your phone, in about 15 minutes, before you leave the property. No computer and no extra editing software.
The short version
- Take a 360° photo of each room and export the photos to your phone.
- Install Clear Pano (iPhone or Android) and create a new tour.
- Import the photos, floor by floor, and name each room.
- Link the rooms with hotspots so viewers can walk from one to the next.
- Recenter each photo, remove the tripod legs and colour grade.
- Add info spots, text labels and your branding.
- Preview the tour, then sync and publish it.
- Share the link, embed the tour on your website, or publish it to Google Street View.
Watch the full tutorial
This guide follows my video tutorial step by step. Every step below links to the exact moment in the video.
Watch “Best Virtual Tour Software 2026: Build Tours On Your Phone In 15 Mins” on YouTube
What you need
- A 360 camera. Any model works, including the Insta360 X6, X5 and X4, and cameras from DJI and Ricoh.
- A phone. Clear Pano runs on iPhone and Android.
- The Clear Pano app. Your first tour is free.

Steps in this guide
- Download your 360° photos to your phone
- Install Clear Pano and create a new tour
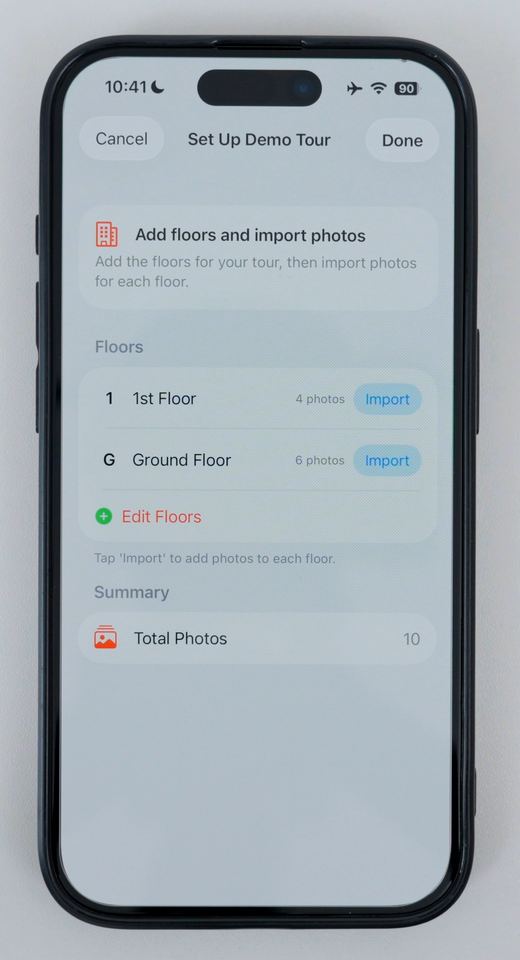
- Add the floors of the property
- Import your 360° photos
- Rename your scenes
- Link your rooms with hotspots
- Recenter each photo
- Remove the tripod legs and unwanted objects
- Colour grade your photos
- Add info spots
- Add text labels
- Preview your tour and turn on the walkthrough effect
- Choose a thumbnail for each scene
- Add your branding and logo
- Set up Google Street View (optional)
- Sync and publish your tour
- View, share and embed your tour
- Publish to Google Street View
Download your 360° photos to your phone
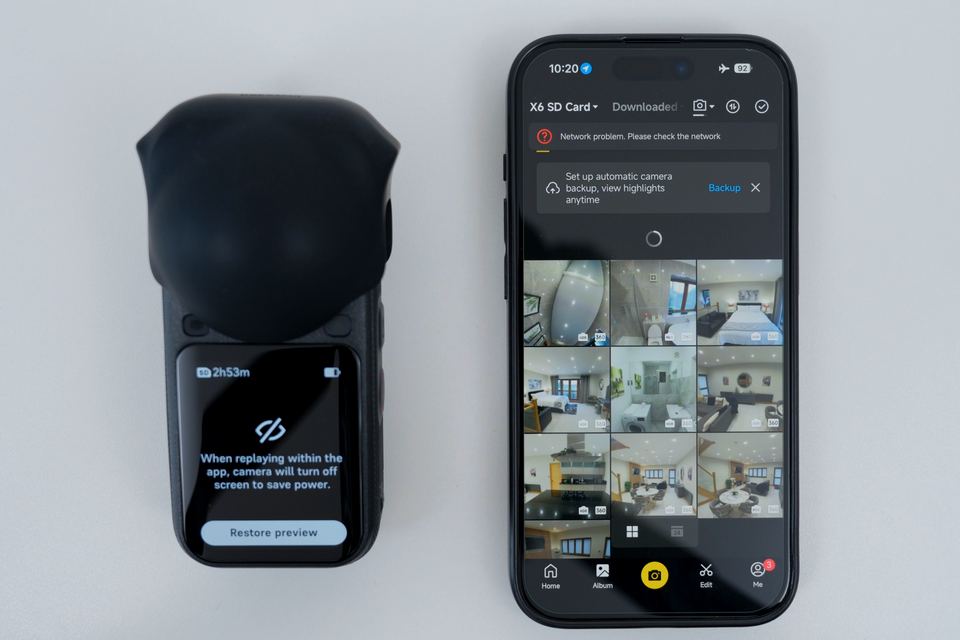
▶ Watch this step at 0:59A virtual tour starts with a 360° photo of each room. You can use any 360 camera, including Insta360, DJI and Ricoh models. First get the photos from the camera onto your phone:
- Turn on your 360 camera and open the camera's own app on your phone.
- Connect the camera to the app.
- Tap Select and choose the photos you took at the property.
- Tap Export to phone, then Save to album.
- Wait for the export to finish. You can then turn the camera off.
The photos are now in your phone's photo album, ready to import.
Install Clear Pano and create a new tour
▶ Watch this step at 1:55Download Clear Pano for iPhone or Clear Pano for Android, open it and create an account. Your first tour is free.
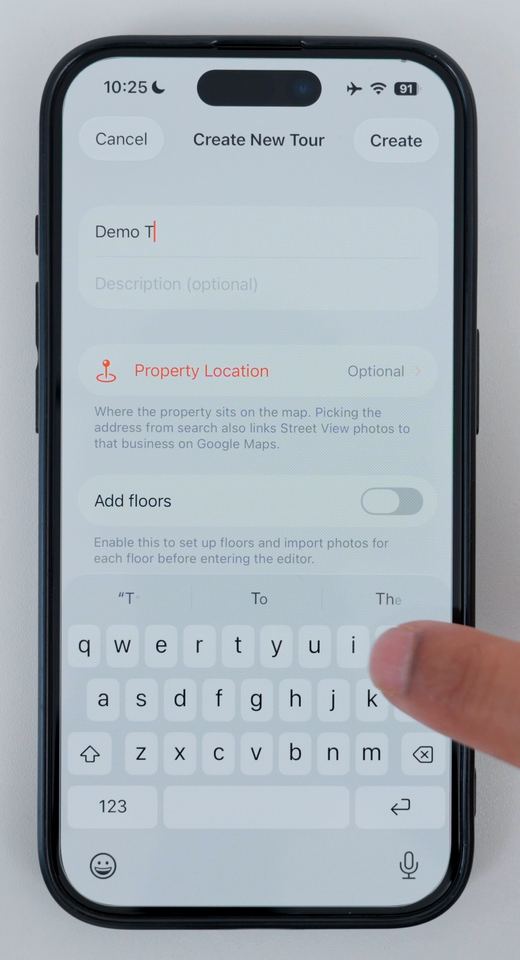
- Tap New Tour.
- Enter a tour name, for example “Demo Tour”.
- Enter a description, for example “Semi-detached house for sale”.
- Tap Property Location, find the property on the map, pinpoint it and tap Set Location.
- If the property has more than one floor, turn on Add floors. This makes it easier to import photos floor by floor.
- Tap Create.
Add the floors of the property
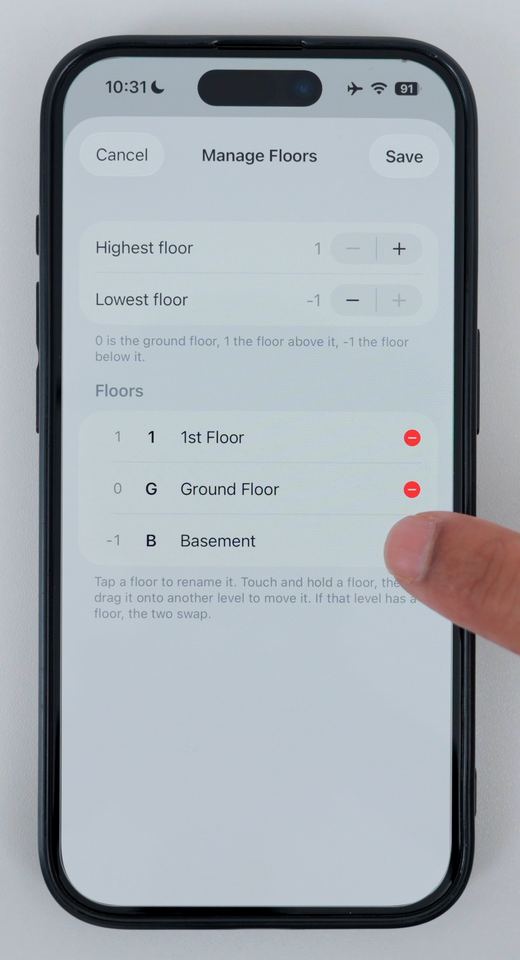
▶ Watch this step at 2:52If you turned on Add floors, you now tell Clear Pano which floors the property has. The example house has a ground floor and a first floor.
- Tap Add Floor once for each floor.
- Tap a floor to name it. Clear Pano suggests a name and a short button label, such as “Ground Floor” with the label G, or “1st Floor” with the label 1. Edit them if you want, then tap Add.
- For floors below ground, add a lower floor and name it, for example “Basement” with the label B.
- Tap Save when your floors are complete.
Single-storey property? Skip this step.
Import your 360° photos
▶ Watch this step at 4:33Now import the photos for each floor.
- On the ground floor, tap Browse Photos, select all the ground floor photos and tap the tick to confirm.
- Do the same for the first floor and any other floors.
- Tap Done. Your tour is created.
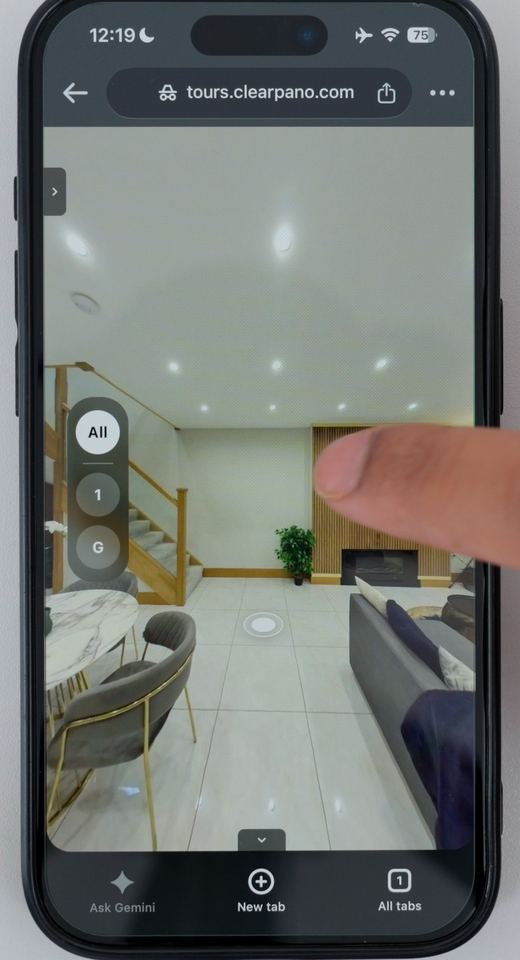
In the editor, a floor selector lets you show one floor's photos at a time, or tap All to see every photo. If you later publish to Google Street View, viewers get the same floor selector there.
To reorder scenes: hold your finger on a scene, drag it to the right position and let go.
Rename your scenes
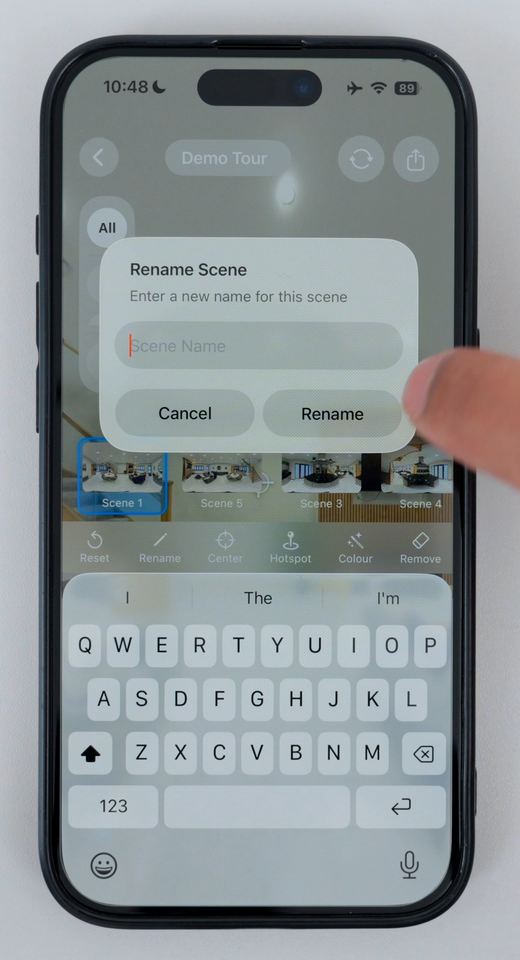
▶ Watch this step at 6:01Each photo is a “scene”. Give every scene a clear room name so viewers know where they are.
- Select the scene you want to rename.
- Tap Rename.
- Tap the X to clear the text and type the new name, for example “Living Room”.
- Tap Rename.
Repeat for all your scenes.
Link your rooms with hotspots
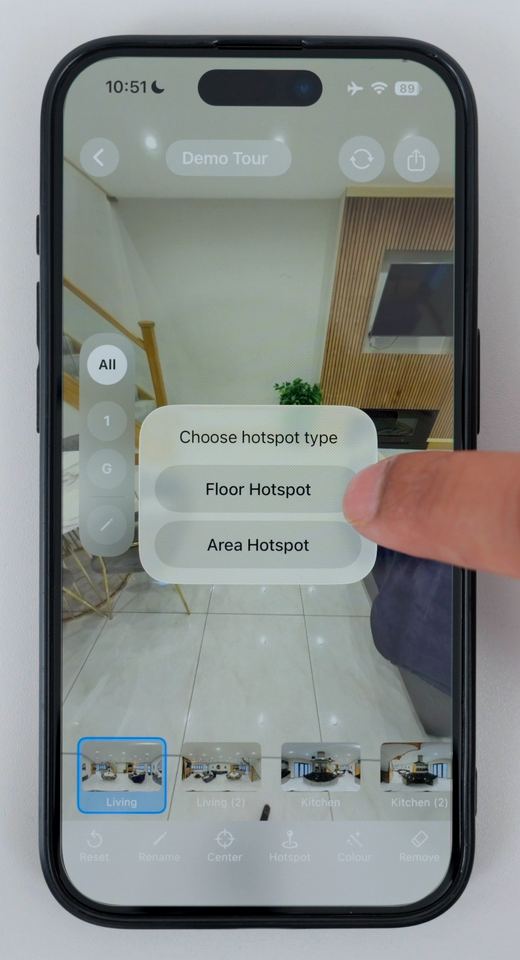
▶ Watch this step at 6:41Hotspots are what turn separate 360° photos into a tour. A viewer taps a hotspot to move from one photo to the next.
- Point the crosshair at the spot where the next photo was taken.
- Hold your finger down on the screen.
- Choose the hotspot type. Pick Floor Hotspot when the spot is on the floor in the same space. Pick Area Hotspot when it leads into a new area, such as through a doorway.
- Select the scene that was taken at that spot.
Repeat until every scene is linked.
Stairs: you can point the crosshair at the stairs, add an Area Hotspot and link it to the first photo upstairs. The simpler option, and the one I recommend, is to let viewers change floors with the floor switcher.
To find a hotspot quickly, tap the hotspot button. To delete one, hold your finger on the hotspot button and tap Delete.
Recenter each photo
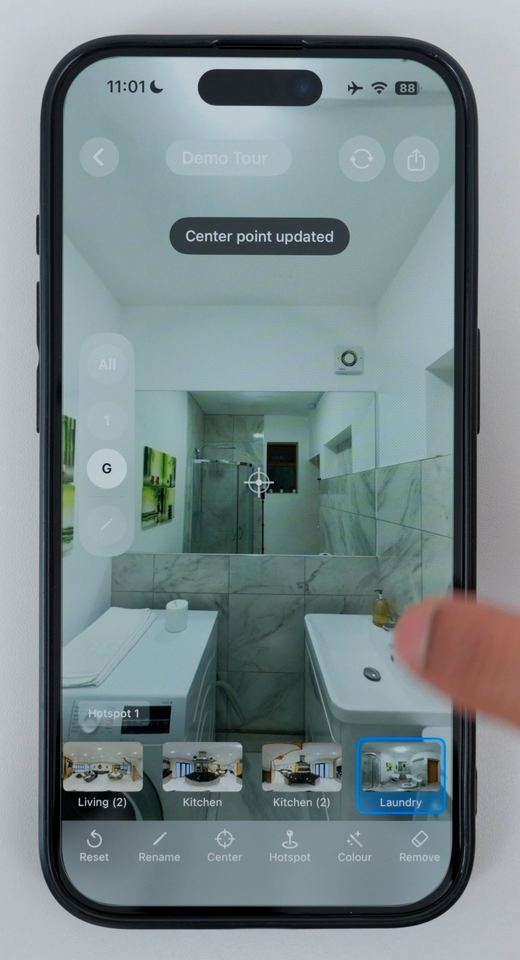
▶ Watch this step at 9:05The center point is the direction a photo faces when it first loads. Set it so each room opens on its best view.
- Go to the scene and turn it to face the direction you want.
- Tap the Center button.
You'll see “Center point updated”. From now on, that photo always loads facing this way.
Remove the tripod legs and unwanted objects
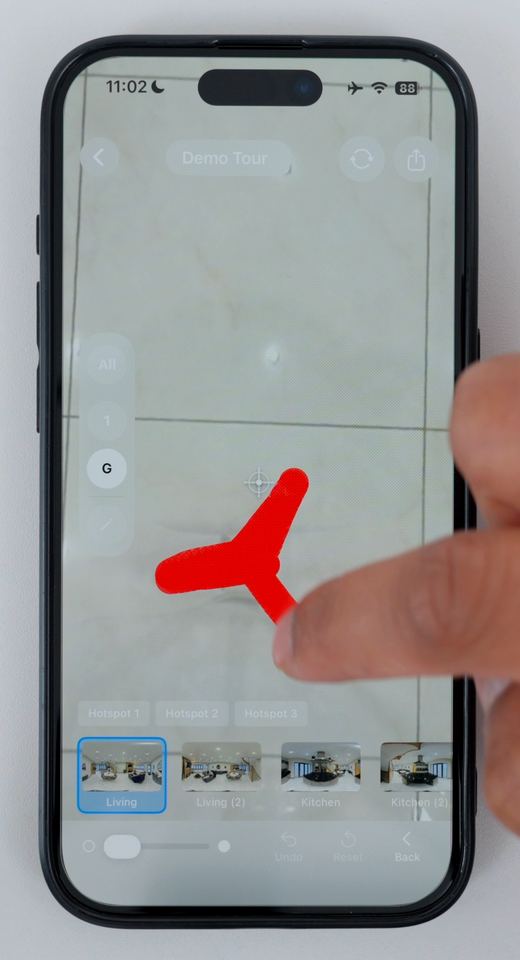
▶ Watch this step at 9:35Every 360° photo has tripod legs at the bottom. Clear Pano removes them on your phone, with no separate editing app.
- Go to the first photo and point the crosshair down at the tripod legs.
- Tap Remove in the toolbar.
- Paint a selection over the tripod legs. Make sure they're fully covered.
- The tripod legs disappear. Move to the next photo and repeat.
The same tool removes other things, such as a reflection of the camera and tripod. Point the crosshair at the object, tap Remove again and paint over it.
Colour grade your photos
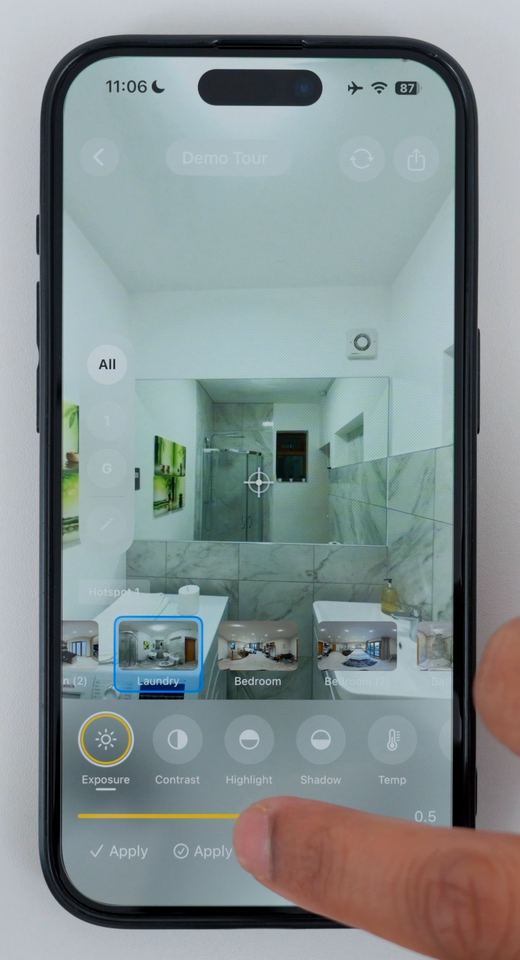
▶ Watch this step at 11:30If a room looks dark, brighten it.
- Choose the photo you want to adjust.
- Tap Colour and experiment with the sliders. In the video I raise Exposure to brighten a dark laundry room, then raise Shadow to lift the shadows.
- Apply the changes to this photo only, or apply them to all the photos in the tour.
Add info spots
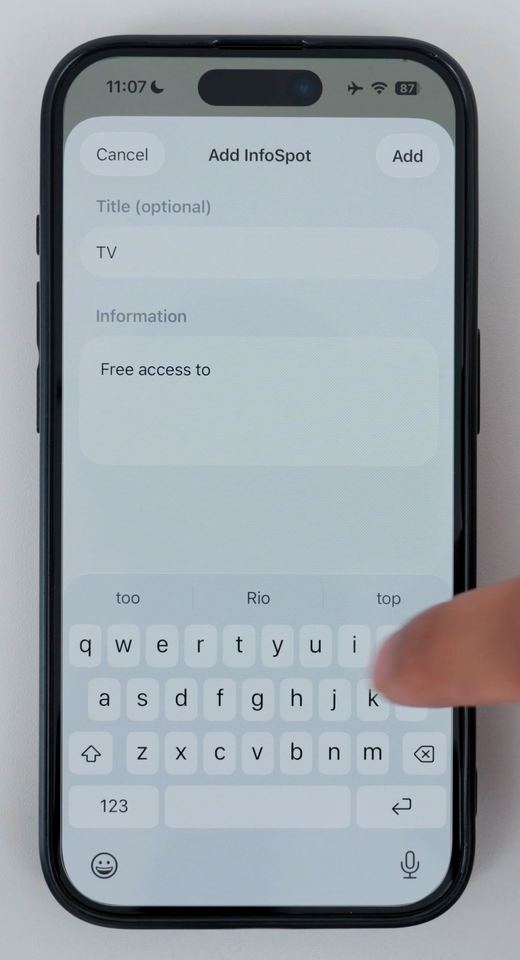
▶ Watch this step at 12:22Info spots let you attach details to something in the room. Viewers tap the spot to read them.
- Point the crosshair at the object, for example the TV.
- Tap Info in the toolbar.
- Type a title (“TV”) and the information (“Free access to premium TV channels”).
- Tap Add.
Add text labels
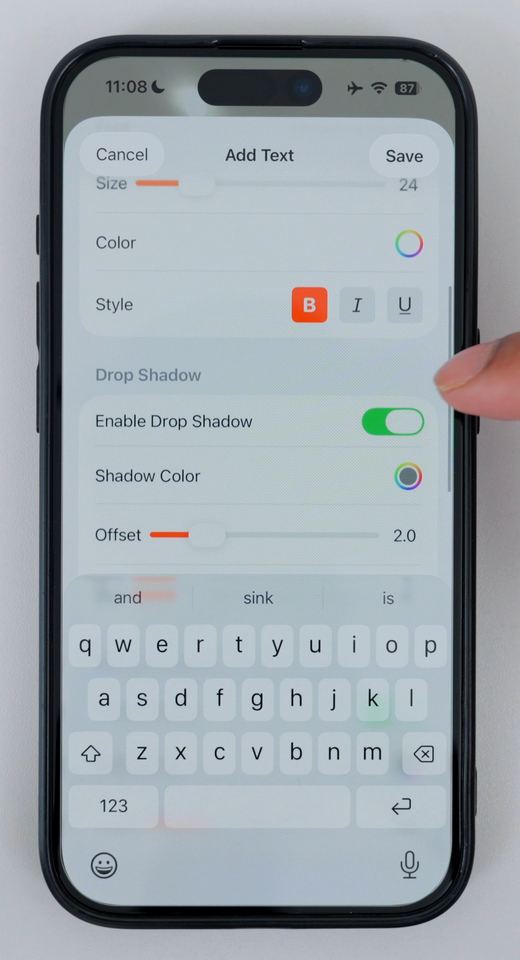
▶ Watch this step at 13:19You can also place text directly in a photo, such as a room name.
- Point the crosshair where the text should appear.
- Tap Text in the toolbar.
- Type the text, for example “Kitchen”.
- Choose the font, size and style. Turn on the drop shadow and stroke to make it stand out.
- Tap Save.
Preview your tour and turn on the walkthrough effect
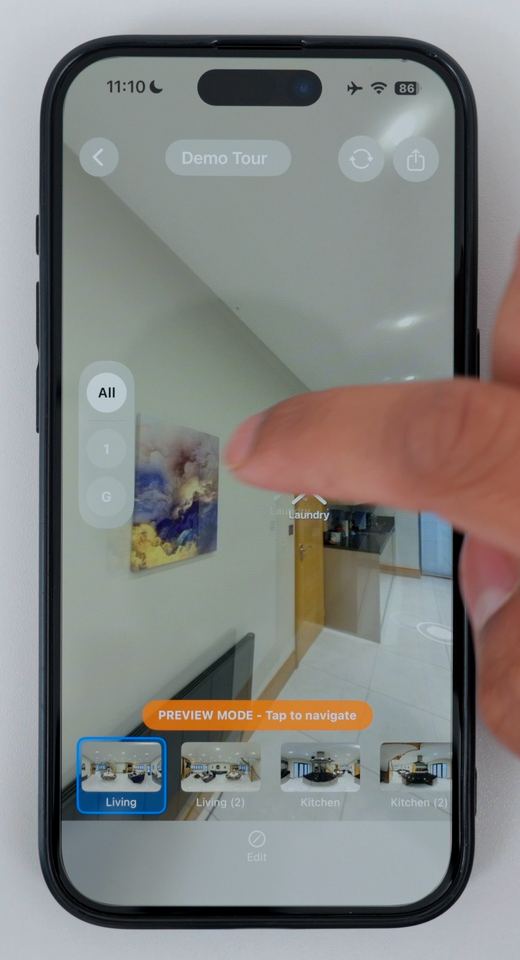
▶ Watch this step at 14:00Tap Preview to see the tour exactly as a viewer will. Look around, tap an info spot and tap a hotspot to move between rooms.
To make moving between photos feel like walking through the property:
- Tap Edit to leave preview mode.
- Tap Walkthrough in the toolbar.
- Go back to Preview and tap through the tour.
Choose a thumbnail for each scene
▶ Watch this step at 15:00Each scene has a small thumbnail in the scene list. You choose what it shows.
- Tap the scene thumbnail you want to change.
- Turn the photo so the crosshair is on the view you want as the thumbnail.
- Tap Thumbnail in the toolbar.
Add your branding and logo
▶ Watch this step at 15:28Tap the tour name to open Tour Information. This holds the details you entered when you created the tour. Here you can also choose the tour thumbnail that appears with your share link.
To show your brand on the tour:
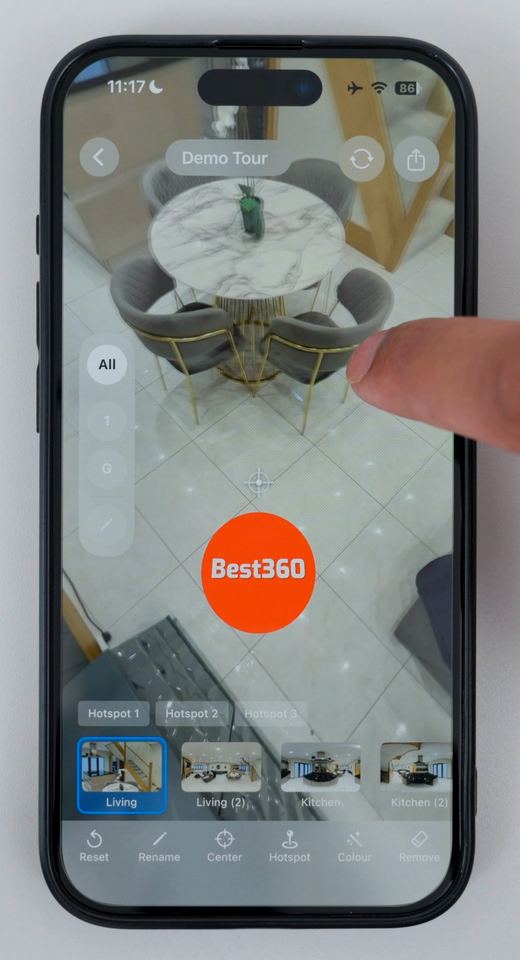
- Tap Create Brand.
- Add your logo, company name, a description of your brand and your contact information.
- Tap Save, then Save again.
Once you have a brand, a Nadir option appears. A nadir is a logo placed at the very bottom of a 360° photo, where the tripod stood.
- Tap Nadir and turn it on.
- Adjust the size and tap Apply.
Your logo now appears at the bottom of every photo in the tour.
Set up Google Street View (optional)
▶ Watch this step at 16:59If you want the tour to appear on Google Maps, you need to tell Google where each photo was taken and which way it faces.
- Scroll the toolbar to GSV and tap it.
- Sign in with your Google account.
- Zoom all the way in on the map so you can be as accurate as possible.
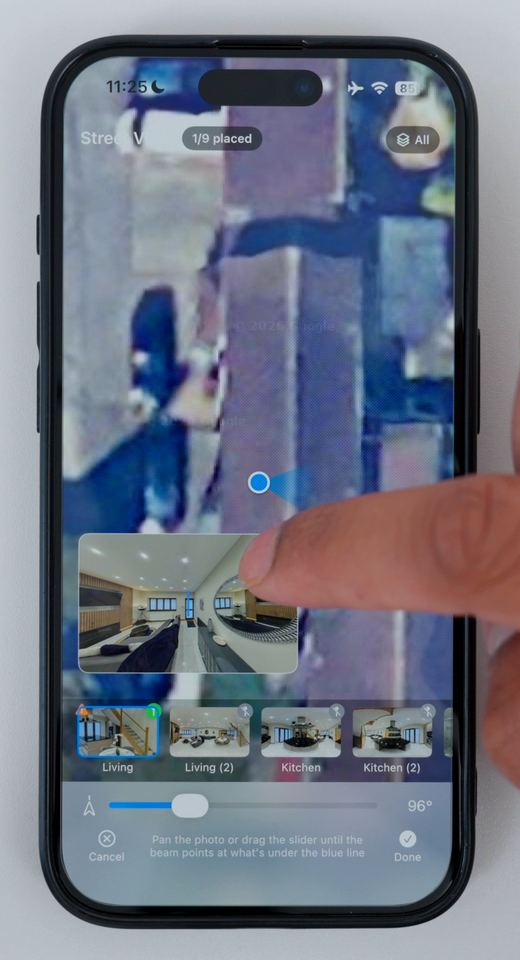
- With the first photo selected, point to where it was taken and tap Add Pin.
- Tap Orientation. In the picture-in-picture view, find a landmark whose direction you know, such as the front door. Turn the photo so it matches that direction on the map, then tap Done.
- Move to the next photo and repeat until every photo has a pin and an orientation.
- Tap Publish GSV, then go back.
Tip: in the video I use the front of the house as the landmark for every photo, because I always know which way it faces on the map.
The tour is now ready to publish to Google Street View, complete with a floor selector.
Sync and publish your tour
▶ Watch this step at 23:20First, back the tour up. Tap Sync and wait for it to finish. A synced tour is saved to the cloud, so if you change phones and open Clear Pano on the new one, the tour downloads automatically.
Then put it online:
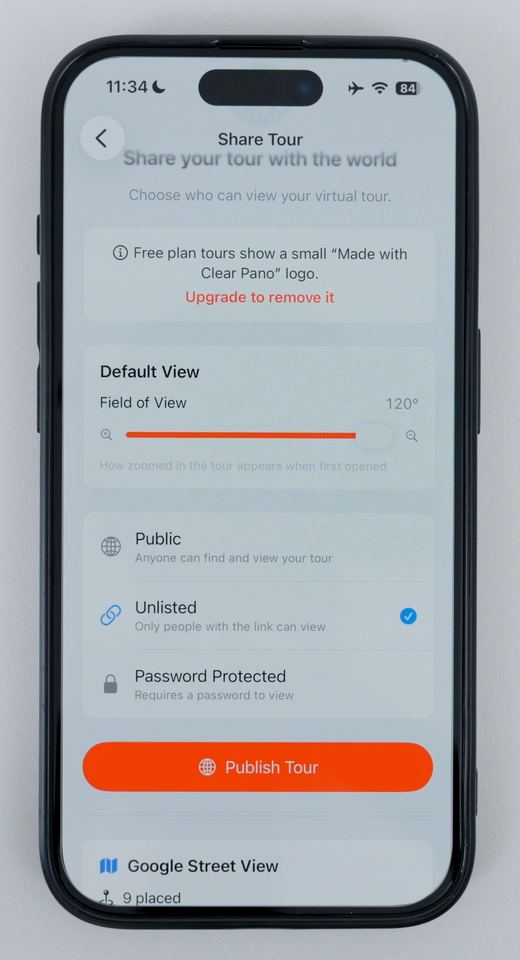
- Tap Publish.
- Choose how zoomed in the tour opens. I prefer zoomed out all the way, so viewers see more of the room when it loads.
- Choose who can see the tour:
- Public: anyone can find and view it, and Google can index it.
- Unlisted: only people with the link can view it, and Google does not index it.
- Password Protected: only people with the password can open it.
- Tap Publish Tour.
Your tour is now online.
View, share and embed your tour
▶ Watch this step at 24:43Tap Copy Link, open your web browser and paste the link. The tour loads, and you can look around, switch floors, read the tour information and see your branding and all the scenes. Send the same link to clients or add it to a property listing.
To embed the tour on a website:
- Tap Embed on Website.
- Choose an aspect ratio. I find 4:3 works best.
- Tap Copy Embed Code and send it to your web developer to add to the site.
Publish to Google Street View
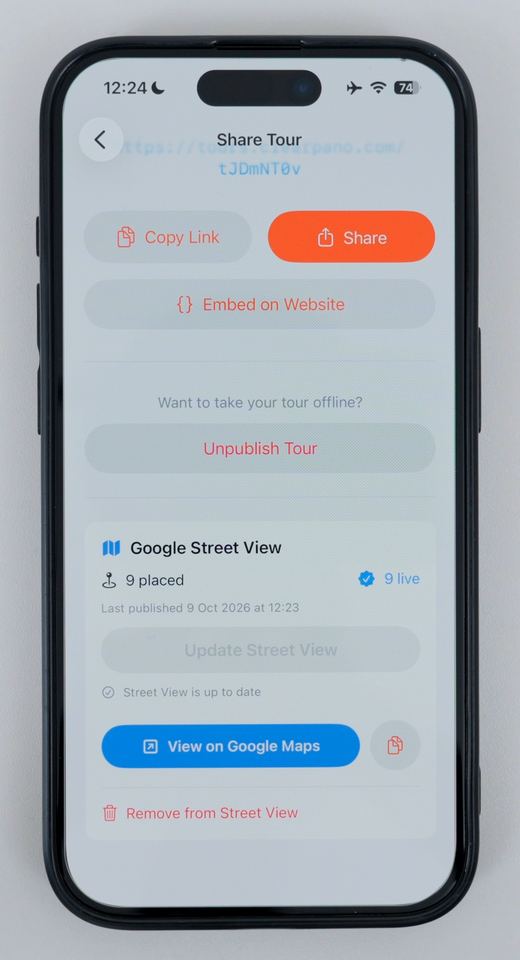
▶ Watch this step at 25:47If you set up Street View in step 15, you can now send the photos to Google. This needs a paid Clear Pano plan.
- Wait until the photos show as ready to publish.
- Tap Publish to Street View.
- Stay on this screen until it finishes, and don't let the phone go to sleep. A strong Wi-Fi connection helps the photos upload quickly and without errors.
- When it's done, you'll see a confirmation that your photos are live and Street View is up to date.
To see them, tap View on Google Maps. In the Google Maps app you can also go to Contribute, then See contributions, then See all photos.
Be patient with Google: your photos appear in your contributions straight away, but the arrows and blue dots that link them on the map can take days, and sometimes weeks, to appear. It depends on how many photos Google is processing.
Make your first virtual tour free
Download Clear Pano, follow the steps above and publish your first tour today. No computer, no credit card.
Frequently asked questions
How long does it take to make a virtual tour?
Once your 360° photos are on your phone, you can build a virtual tour of a typical house in about 15 minutes with Clear Pano. That covers importing the photos, linking the rooms, removing the tripod, adding your branding and publishing.
What do I need to make a virtual tour?
You need three things: a 360 camera, a phone, and a virtual tour app. Clear Pano runs on iPhone and Android, so you don't need a computer or any other editing software.
Can I make a virtual tour without a computer?
Yes. With Clear Pano, every step happens on your phone: importing 360° photos, recentering them, colour grading, removing the tripod legs, linking the rooms and publishing. You can finish the tour before you leave the property.
Which 360 cameras can I use?
Any 360 camera works, including the Insta360 X6, X5 and X4, and cameras from DJI and Ricoh. Export the photos to your phone's photo album, then import them into Clear Pano.
How much does it cost to make a virtual tour?
Your first virtual tour with Clear Pano is free. Paid plans start at $5 a month for up to 10 published tours.
Can I put my virtual tour on Google Street View?
Yes, on a paid Clear Pano plan. You place each photo on the map, set which way it faces, and publish to Google Street View from the app. The photos appear in your Google Maps contributions straight away, while the arrows and blue dots that link them can take days, and sometimes weeks, to appear.
How do I share a virtual tour or add it to my website?
When you publish a tour you get a link. Copy it to share with clients or add it to a property listing. To show the tour on a website, tap Embed on Website, choose an aspect ratio and copy the embed code.
Where to go next
- Clear Pano user guide: a shorter, illustrated walkthrough of the app.
- Free playbook: how to start a virtual tour business.
- Free playbook: how to make money with Google Street View tours.
- Questions? Ask in the Clear Pano Telegram community or the Clear Pano Facebook group.